It takes much time to compose large images into a single image. In my experiments, I am using forty images to generate an intensity attenuated image. This is even more true when the size of an image is huge like about 12,000 x 9,600. One image has 115,200,000 pixels in this size. Think about forty images when they are processed. It took me eight seconds to compose two images into one with a simulated transparent channel. More than five minutes are needed to generate a single composed image from forty images. I have around 9,628 images. From my rough calculation it will take my machine more than a month to process all the images. This is not a big problem since this process should be done only one time. But I do not like this since I have more tissue samples to process.
My idea is to use multiple computers at the same time in our department’s network. NAS (Network Attached Storage) can be a solution to address this issue. Using the network storage is a good approach because the bottle neck of this system is not reading and writing image data files but processing images. (I realized that reading/writing image files from an NAS take much more time than processing them from my experiments. It will not reduce total consuming time as I initially expect but is worth to use the minimal parallelism.) So it is good to use as many computers as possible to reduce whole processing time.
I purchased a NAS that is Synology DiskStation; DS212j along with two hard disk drives; 2TB and 3TB. This will give me enough space at least for a while.
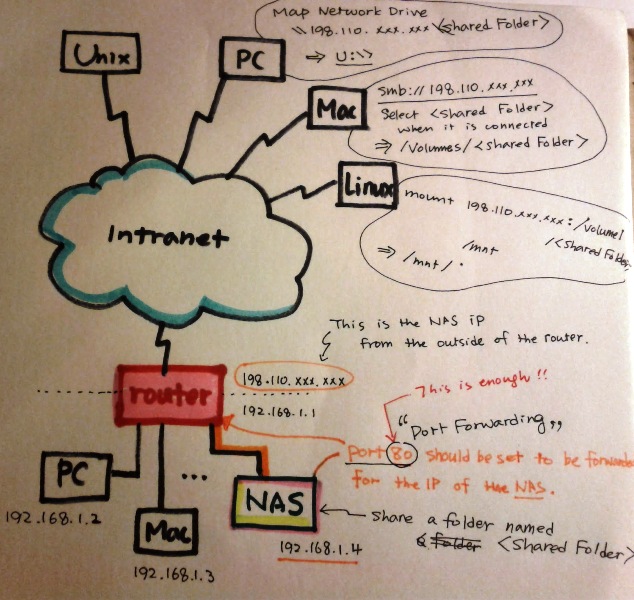
I have one desktop PC and one Mac Pro under a router in my office. The new NAS is attached to the router. Four high performance PCs in a lab of the ECE department are available for five days in a week. Eight Mac minis in my Mobile App Lab are also usable. I am going to utilize all those computers as much as possible.
Here is a rough system design for it. Tools in KESMSuite should be expanded to be run on this configuration. The port number 80 (this is a default port for HTTP) for the IP address of the NAS should be ‘Port Forwarding’ in the router settings. To my surprise, this port forwarding is enough for this system to work.


