Using Eclipse with CDT in Windows

Unlike in Mac OS X, it is harder to install Eclipse with CDT in Windows than it looks. This is partially because the Windows OS does not have Java Runtime Environment as default settings. Another problem is that there are two versions, 32-bit and 64-bit, under the same name of the OS. x64-base processors can have either 32-bit OS or 64-bit OS.

Windows 32-bit or 64-bit?

First thing first. Make sure that what system type of Windows you are using. If your PC is pretty new, most likely you have 64-bit Windows. If not, it could be 32- or 64-bit. One simple way to find out which version you are using is to check the “Program Files” folder name. If your system has “Program Files (x86)” along with “Program Files” then your OS is for 64-bit. You may open Control Panel to see the version. The “System type:” in “System and Security->System” tells 64-bit OS or 32-bit OS. Again using x64-bit based processor does not guarantee that the OS type is 64-bit.

Java Runtime Environment

Eclipse is an executable program written in Java and built for Java. Java executables need Java Virtual Machine. Java Runtime Environment or JRE is a basic package to run Java programs. There are several “Editions” in Java. Java SE (Standard Edition) is good for Java applications on desktops and servers. You may find Java “Development” Kit, or JDK while you are googling Java SE Download. This is for Java Developers and includes JRE. We do not need this version because we just want to run a Java program, Eclipse. Download one “jre” according to your OS type. x64  means it is for Windows 64-bit OS. x86 is for Windows 32-bit OS. Install it. Clear check boxes when the Java Setup asks to install something along with Java unless you really really really want to install the toolbar for your Web browsers.

MinGW

The next step is to install Minimalists for GNU for Windows or MinGW. This is for someone who wants to use the GNU Compiler Collection to develop native Windows applications without installing Cygwin (a Unix-like environment and command line interface for Windows). Use an installer to install necessary packages. The installer, mingw-get-setup.exe, can be downloaded from http://sourceforge.net/projects/mingw/files/Installer/ Run the installer and select two packages: mingw32-base and mingw-gcc-g++. Then select the menu item, “Apply Changes” in the “Installation” menu.

Eclipse CDT

Find a Eclipse package with the latest CDT at http://www.eclipse.org/cdt/downloads.php. And again download one according to your OS type. There are Eclipses with CDT for Windows 32-bit and 64-bit.

Project – Hello World ANSI C Project

Select “New – C Project.” Put a name in “Project name:” And select “MinGW GCC” as your “Toolchains:” The Toolchain is a set of programming tools. And we are using MinGW GCC as the toolchain.

Build the Project Manually at First

The newly generated project must be built manually at least once before you run the program. Go to and select the menu “Project – Build Project.”

That’s it.

Get PhoneGap to Work on Mac OS X

PhoneGap is a free open source framework that allows us to create mobile apps using standard web technologies such as HTML, CSS, and JavaScript (http://phonegap.com).

If you follow the steps in the web page, Install PhoneGap (http://phonegap.com/install/), most likely you would get stuck in the second or third step. This is because the documentation is horrible and gives us a lot of confusions.

Earlier versions of PhoneGap were tightly integrated into Eclipse and Xcode. But it is obvious that PhoneGap stops catching up new updates of various platform. It seems that they went back to command line tools with poor quality documentations.

It makes me think that the only reason why Adobe purchased this company was just to kill this product.

Anyway, let us get started. To install 3.3 version of PhoneGap, Node.JS is required.

1. Install Node.JS

Go to http://nodejs.org and find the INSTALL button. Click it to install. This step is very straightforward and easy thanks to the node.js install program.

2. Install PhoneGap

Open “Terminal” and run the following.

{!{code}!}czozMDpcIiQgc3VkbyBucG0gaW5zdGFsbCAtZyBwaG9uZWdhcFwiO3tbJiomXX0={!{/code}!}

phonegap is a command line tool. You will be able to use “phone gap” command to create a project. But you will NOT be able to build or run the app in any platform.

3. Create a Project

{!{code}!}czozNjpcIiQgcGhvbmVnYXAgY3JlYXRlIG15LWFwcAokIGNkIG15LWFwcFwiO3tbJiomXX0={!{/code}!}

This will create a phone gap project but it doesn’t include any platform dependent modules.

4. Install Cordova

There are buzzes regarding to PhoneGap, Cordova, and their relationship. Here is a clarification from PhoneGap Blog. http://phonegap.com/2012/03/19/phonegap-cordova-and-what’s-in-a-name/

To make the long story short,

PhoneGap is a distribution of Apache Cordova. You can think of Apache Cordova as the engine that powers PhoneGap, similar to how WebKit is the engine that powers Chrome or Safari.

And,

If your goal is to build cross platform apps with HTML, JS and CSS then keep on using PhoneGap for everything you need. This isn’t to say the transition has been perfect. We messed up the last release by not correctly updating the documentation to reflect the name change which confused new users.

The conclusion is that we NEED cordova installation along with PhoneGap. Very weird.  Right? Anyway use the following command.

{!{code}!}czoyOTpcIiQgc3VkbyBucG0gaW5zdGFsbCAtZyBjb3Jkb3ZhXCI7e1smKiZdfQ=={!{/code}!}

5. Add Platforms to a Project

The folder “platforms” inside “my-app” (the newly created project folder) has nothing from your creation. We have to add platforms (such as android and iOS). This is the moment where we have to use cordova. Let’s add the iOS platform that means cordova creates all necessary files to be a proper project for Xcode.

{!{code}!}czoyNjpcIiQgY29yZG92YSBwbGF0Zm9ybSBhZGQgaW9zXCI7e1smKiZdfQ=={!{/code}!}

Next let’s add the android platform.
{!{code}!}czozMDpcIiQgY29yZG92YSBwbGF0Zm9ybSBhZGQgYW5kcm9pZFwiO3tbJiomXX0={!{/code}!}

You will see an error saying that ‘ant’ is not installed if you have installed it already in your system. Also I assume that you do not have MacPorts as well just like me. Let’s use “homebrew” to install “ant.”
$ ruby -e "$(curl -fsSL https://raw.github.com/mxcl/homebrew/go/install)"

After homebrew is successfully installed, use followings.
$ brew install ant

Now you are suppose to be able to install “android” platform. Try this again.
$ cordova platform add android

Now you can find two folders (ios and android) in the “platforms” folder.

6. Build Projects

Finally you are ready to build projects.

$ phonegap run android

This will compile, build, and install the project onto the device. If no Android device is connected to the system, it will start the Android emulator.

In  the same manner, use following to build and run the project for iOS.

$ phonegap run ios

You will see an error that says ios-sim was not found even though you have installed Xcode and by which your system has iOS Simulator already.

$ sudo npm install -g ios-sim

If you prefer using IDEs, you may import the android project from ADT and start the Xcode project file on Xcode.

Useful link for research skills

A few days ago, one of my former colleagues from Texas A&M shared an interesting video featured by Simon PJ from Microsoft Research. The video was about how to write a good paper. It was very useful. So I googled him and found more materials from his web page. http://research.microsoft.com/en-us/people/simonpj/

The page has links about how to write a good research paper, give a good research talks, and write a good grant proposal.

http://research.microsoft.com/en-us/um/people/simonpj/papers/giving-a-talk/giving-a-talk.htm


Pull-up Resistor

Floating

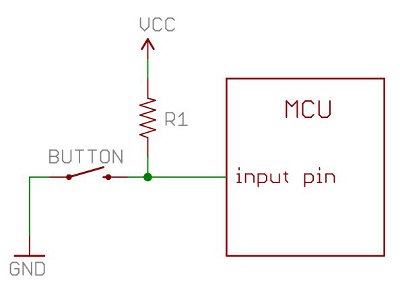
See the picture [1] below. When the switch is connected, the input pin will get the high level. But what if the switch is not connected. It is hard to tell the input pin will be read as high or low. Also the value of the input pin is very much susceptible by noise. This phenomenon is referred as floating.

Pull-up Resistor

A resistor (usually more than 10KΩ. See the picture [2] below) can guarantee that the value of the input pin is high when the switch is disconnected.

For more details, reading [2] is recommended.

  • [1] http://www.madsciencenotebook.com/basicelectronics/pull-up-resistor/
  • [2] https://learn.sparkfun.com/tutorials/pull-up-resistors/what-is-a-pull-up-resistor

OpenCV for Android

Why another tutorial for OpenCV for Android? I followed a tutorial from the OpenCV official website. It was disappointing. It turned out there are many problems during installation and building examples in my Mac OS X system.

My Android SDK version is 4.2.2 (API 17) with Android Development Tools (ADT) for its IDE. I believe this tutorial works as well with Android 4.3 (API 18) in Mac OS X.

Here is a list of steps to follow to get OpenCV for Android ready for you.

Download OpenCV for Android

  1. Download OpenCV for Android from http://opencv.org/downloads.html. You can find an Android version from the web. As I am writing this, the latest version is 2.4.6.
  2. Unzip the zip file and you will see a folder.
  3. Place the folder into a proper folder. In my case, I created a folder in my Documents and named it as work. And copy the OpenCV folder into the new folder.
  4. This is it for now until we build the libraries and samples.

Download Android NDK

You may find an NDK Plugins item from the menu Help – Install New Software. I tried this. But it shows the following error message.

Cannot complete the request. See the error log for details.
“Android Native Development Tools” will be ignored because it is already installed.

So I went to the Android NDK webpage and found a package. It seems we need to install this manually.

  1. Download a package from http://developer.android.com/tools/sdk/ndk/index.html. You can find two packages for each platform. Just select the first package which is a current and recommended toolchain for the NDK.
  2. Unzip it.
  3. Find a folder named “android-ndk-<version>.”
  4. Place this folder into the “work” folder. See the ‘Download OpenCV for Android’ section for more detail about the “work” folder.

Build OpenCV Library and Samples

Now we are kind of ready to build OpenCV Samples because we have to take a few more steps after importing Android projects from the OpenCV folder to your ADT’s workspace.

There is an NDK item in the Preferences of ADT under the Android section. It looks like we have to put NDK folder into the blank. But this is useless at least for the OpenCV samples. So you may ignore this NDK item in the Preferences.

  1. Select File – Import – Android – Existing Android Code into Workspace.
  2. You will see the ‘Import Project’ dialog.
  3. Choose ‘Root Directory’ by clicking the ‘Browse…’ button. The directory is the top folder of the OpenCV folder that you placed in the section ‘Download OpenCV for Android.’
  4. Now you can see five samples and three tutorials and one library. Select all the projects. If you want to use only one sample or tutorial, please don’t forget to select the project “sdk/java – OpenCV Library.” Then Click the ‘Finish’ button.
  5. If you want to maintain all original samples in the folder, you can check the “Copy projects into workspace” checkbox. This will copy all source code into your workspace.
  6. Some projects will show compile errors. According to OpenCV website tutorials, the errors will be shown only on a non-Windows operating systems. Anyway, I am using a Mac. So I see the errors. The remedy in the web http://docs.opencv.org/doc/tutorials/introduction/android_binary_package/O4A_SDK.html didn’t work for me. Here is what I did.
  7. First of all, NDKROOT is not defined in my system. Add NDKROOT with the value of the actual android-ndk folder that you placed in the section ‘Download Android NDK.’ This should be done all the complaining projects with errors.
    1. Go to Properties (@I) of each project. Note that this is NOT ‘Preferences.’ Select one project and right click. Find the Properties item in the bottom of the context menu.
    2. Find C/C++ Build – Environment.
    3. Add a variable. Name it NDKROOT and put a value with your android-ndk folder.
  8. Then go back the C/C++ Build item in the Properties. You can find ‘Build command:” Its corresponding text input box has either ${NDKROOT}/ndk-build.cmd or “${NDKROOT}/ndk-build.cmd” (Note that the quotation marks!). Remove ‘.cmd’ and the quotation marks if it has. I just want ${NDKROOT}/ndk-build in the text input box.

OpenCV Manager

If your Android phone does not have OpenCV Manager, you should download it from https://play.google.com/store/apps/details?id=org.opencv.engine&hl=en.

That’s it. Enjoy OpenCV for Android!!!

References:

iOS Simulator Location Servies Settings

In iOS Simulator, if you choose “Don’t Allow” when you are prompted “Your App” Would Like to Use Your Current Location, there is no obvious way to turn it on back.

Here is a solution.

  1. Start Settings in the simulator.
  2. Select “Reset Location & Privacy” in the General – Reset.
  3.  Select “Reset Warnings” when you are prompted.

That’s all.

Now you will see the selection dialog when you start your app using Core Location.

Problems in updating Android SDK Tools with rev. 22

You may find an error after updating your Android SDK with Rev. 22. When you restart the ADT, you will see this error.

This Android SDK requires Android Developer Toolkit version 22.0.0 or above.
Current version is 21.x.x.
Please update ADT to the latest version.

The problem is you will not be able to update it from the “Check Updates” button. Clicking the button leads you to the “No updates were found” window along with the “Problem Occurred” window. If you ignore the problem, this error prevents us from running any of your existing projects.

This is because of the wrong URL of the Android Developer Tools Update Site. You cannot fix this problem by changing the Install/Update – Available Software Sites – Android Developer Tools Update Site since it adds automatically “content.xml” at the end of the URL.

Here is a list of steps that you need to take.

  1. Help – Install New Software in the ADT menu.
  2. Type https://dl-ssl.google.com/android/eclipse/site.xml in “Work with:” and Enter.
  3. You can see the “Developer Tools” item.
  4. Select it and click Next.
  5. Click Next one more.
  6. Click Finish accepting the terms of the license agreements.
  7. Click OK in the “Security Warning” window.
  8. Let the installer restart ADT after installing the tools.

That’s it.

GoogleMaps Demo

Here is a simple example of Android Maps v2 using MapFragment. We are assuming that the Google Play services SDK is installed. If you don’t have the SDK, please install before this. See details at here.

New Project

  • File > New > Android Application Project
    • Application Name: MapsDemo
    • Package Name: edu.kettering.mapsdemo
    • Minimum Required SDK: API 11: Android 3.0
      • Note: Fragment was introduced in API 11
    • Compile With: Google APIs (Google Inc.) (API 17)
      • If you have not installed Google APIs, Install it using the Android SKD Manager. Google APIs are the superset of Android APIs. This means “Google API level 17” means “Android 4.2.2 (level 17) + Google APIs.”
  • Use default values for all the options.

Adding Library

Add Google Play services library.

  • Project > Properties.
  • Select Android in the left. Find the Library pane. Click “Add…” and select “google-play-services_lib”

Adding MapFragment

  • Open “activity_main.xml” and delete the text view.
  • Drag the “Fragment” in the “Layout” Palette and drop on the main layout.
    • “Choose Fragment Class” will be prompted.
    • Find “MapFragment.”
  • Align the fragment by adjusting the size. The root layout is RelativeLayout. So drag the border lines and drop at the end of the window left, top, right, and bottom.
  • Change the id to “@+id/map”

[code language=”xml”]
<RelativeLayout xmlns:android="http://schemas.android.com/apk/res/android"
xmlns:tools="http://schemas.android.com/tools"
android:layout_width="match_parent"
android:layout_height="match_parent"
android:paddingBottom="@dimen/activity_vertical_margin"
android:paddingLeft="@dimen/activity_horizontal_margin"
android:paddingRight="@dimen/activity_horizontal_margin"
android:paddingTop="@dimen/activity_vertical_margin"
tools:context=".MainActivity" >

<fragment
android:id="@+id/map"
android:name="com.google.android.gms.maps.MapFragment"
android:layout_width="wrap_content"
android:layout_height="wrap_content"
android:layout_alignParentBottom="true"
android:layout_alignParentLeft="true"
android:layout_alignParentTop="true" />

</RelativeLayout>
[/code]

Using GoogleMap class

We can get a GoogleMap object using FragmentManager. A MapFragment can be acquired from findFragmentById. The map can get from getMap().

[code language=”java”]
package edu.kettering.mapsdemo;

import com.google.android.gms.maps.CameraUpdateFactory;
import com.google.android.gms.maps.GoogleMap;
import com.google.android.gms.maps.MapFragment;
import com.google.android.gms.maps.model.LatLng;
import com.google.android.gms.maps.model.MarkerOptions;

import android.app.Activity;
import android.os.Bundle;
import android.view.Menu;

public class MainActivity extends Activity {
static final LatLng ketteringLatLng = new LatLng(43.013651,-83.713498);
private GoogleMap map;

@Override
protected void onCreate(Bundle savedInstanceState) {
super.onCreate(savedInstanceState);
setContentView(R.layout.activity_main);

map = ((MapFragment)getFragmentManager().findFragmentById(R.id.map)).getMap();
map.addMarker(new MarkerOptions().position(ketteringLatLng).title("Kettering"));
map.moveCamera(CameraUpdateFactory.newLatLngZoom(ketteringLatLng, 15));
}

@Override
public boolean onCreateOptionsMenu(Menu menu) {
// Inflate the menu; this adds items to the action bar if it is present.
getMenuInflater().inflate(R.menu.main, menu);
return true;
}

}
[/code]

Getting an API Key

Get an API Key with the package name, “edu.kettering.mapsdemo” and the SHA-1 fingerprint. See this article for more detail.

Editing AndroidManifest.xml

We need to add permission, uses-permission, use-feature, and meta-data. “edu.kettering.mapsdemo”s in red should be replaced with your app’s package name.

[code language=”java”]
<?xml version="1.0" encoding="utf-8"?>
<manifest xmlns:android="http://schemas.android.com/apk/res/android"
package="edu.kettering.mapsdemo"
android:versionCode="1"
android:versionName="1.0" >

<uses-sdk
android:minSdkVersion="11"
android:targetSdkVersion="17" />

<!– Start Maps –>
<permission
android:name="edu.kettering.mapsdemo.permission.MAPS_RECEIVE"
android:protectionLevel="signature"/>
<uses-permission android:name="edu.kettering.mapsdemo.permission.MAPS_RECEIVE" />
<uses-permission android:name="android.permission.INTERNET"/>
<uses-permission android:name="android.permission.WRITE_EXTERNAL_STORAGE"/>
<uses-permission android:name="android.permission.ACCESS_COARSE_LOCATION"/>
<uses-permission android:name="android.permission.ACCESS_FINE_LOCATION"/>
<uses-permission android:name="com.google.android.providers.gsf.permission.READ_GSERVICES"/>
<uses-feature
android:glEsVersion="0x00020000"
android:required="true"/>
<!– End of Maps –>

<application
android:allowBackup="true"
android:icon="@drawable/ic_launcher"
android:label="@string/app_name"
android:theme="@style/AppTheme" >

<!– Start Maps –>
<meta-data
android:name="com.google.android.maps.v2.API_KEY"
android:value="YOUR_OWN_KEY"/>
<!– End of Maps –>

<activity
android:name="edu.kettering.mapsdemo.MainActivity"
android:label="@string/app_name" >
<intent-filter>
<action android:name="android.intent.action.MAIN" />

<category android:name="android.intent.category.LAUNCHER" />
</intent-filter>
</activity>
</application>

</manifest>
[/code]

Getting Ready to Use Google Maps Android API v2

Why do we need another tutorial for Google Maps Android API v2? I have discovered little things are missed or inaccurate in tutorials here and there (even in Google’s developer guideline). I do not want to repeat every single detail that you can find other places. This can be a supplementary material for Google’s developer guide for Google Maps Android API v2.

We know what the Google Maps is already. Also the 2nd version was introduced many months ago. Google Maps API in Android was also improved and named v2. Many things have  changed since last year.

Let’s get started. I am assuming we are using Eclipse as an IDE.

Install Google Play services SDK

To use Google Maps in Android we should have Google Play services. I don’t know why Google uses the name “Play” for Maps services. Anyway…

  • Start the Android SDK Manager.
  • Find Google Play services in the Extras.
  • Install the package by clicking “Install …” button.

Get the library for Google Play services

After the package is installed. We have to make the library usable for other projects.

  • Import the library so that my project can use it.
    • Go to File > Import > Android > Existing Android Code … and click Next.
    • Browse and find “<your android sdk folder>/extras/google/google_play_services/libproject/google-play-services_lib” and click Finish.
  • We just installed Google Play services library.

Make the sample app, maps work.

There are few samples in the Google Play services SDK. Let us make “maps” work. We could use this as a working template that can be utilized for future projects.

  • Import the sample.
    • Go to File > Import > Android > Existing Android Code … and click Next.
    • Browse and find “<your android sdk folder>/extras/google/google_play_services/samples/maps”.
    • The default new project name of the sample is “MainActivity.” This is not a smart choice at all. Let us change it to something more meaningful such as “MapsSample” before you click the Finish button.
    • Also make sure that you check “Copy projects into workspace” so that the original code is intact.
  • Well.. you can see tons of errors. Look hopeless. But do not worry. We will fix them shortly.
    • Go to Project > Properties.
    • Find Android in the left. You will see the Library pane in your right. If you see the ‘X’ mark in red, select it and click Remove.
    • Click Add… and select the “google-play-services_lib” item. Click OK. Now you can see the check mark in green.
  • Most errors should be gone now. RetainMapActivity has some errors that are from using “FragmentActivity.”
    • Fragment was introduced in Android 3.0 (API level 11). ADT (Build: v21.1.0-569685) makes templates using minSDK 8. The example was written using Support Lib anyway. Let us use the support library.
  • Add a support lib v4 into the project.
    • Make the “libs” folder inside the project folder. If you followed my recommendation in naming the project, the folder name is “MapsSample” and the “libs” folder must be inside the folder.
    • Find “android-support-v4.jar” at “<your android sdk folder>/extras/android/support/v4/” and copy it into the “libs” folder.
    • Go to Project > Properties.
    • Find “Java Build Path” in the left. Select the “Libraries” tab and click “Add External JARs…” Find the “android-support-v4.jar” file. Note: Do not select the jar file inside the Android SDK folder.
    • This must remove all remaining errors.
  • Run the app. You may see the program crashes.
    • Go to Project > Properties.
    • Find “Java Build Path” in the left. Select the “Libraries” tab.  Find the “android-support-v4.jar” file and remove it. I know, I know.. This is a strange step. But it should fix the crash.
  • If you still see errors from GoogleMap related packages and classes, just choose “Fix project setup..” from the Quick Fix suggestion and select “Add archive ‘google-play-services.jar – ….” and click OK. This will add “google-play-services.jar” into the build path.

Emulator

As of writing this Android emulator does not support Google Play services. We should use an actual Android device.

API Key

An API Key is required to use Google Play services.  To get a key we need an SHA-1 fingerprint and the application registration with the Google Maps Android API v2.

SHA-1 fingerprint

  • Locate debug.keysotre file in the “.android” in the current user folder.
    • /Users/&lt;user name&gt;/.android/ or ~/.android/
  • List the SJA-1 fingerprint.
    • keytool -list -v -keystore ~/.android/debug.keystore -alias androiddebugkey -storepass android -keypass android
  • Find the “SHA1:” line in the output.
    • Alias name: androiddebugkeyCreation date: Apr 4, 2013
      Entry type: PrivateKeyEntry
      Certificate chain length: 1
      Certificate[1]:
      Owner: CN=Android Debug, O=Android, C=US
      Issuer: CN=Android Debug, O=Android, C=US
      Serial number: 515de791
      Valid from: Thu Apr 04 16:50:25 EDT 2013 until: Sat Mar 28 16:50:25 EDT 2043
      Certificate fingerprints:
      MD5: 11:22:33:44:A8:0E:99:00:33:94:44:33:55:7E:66:FD
      SHA1: <span style="color:#ff0000">FF:CC:BB:16:99:E3:AA:FF:55:44:42:77:AE:55:46:99:43:55:88:C2</span>
      Signature algorithm name: SHA1withRSA
      Version: 3
    • Copy the hexa-decimal string after “SHA1:” (Note that the string above is not actual fingerprint)

Registration

  • Go to https://code.google.com/apis/console/
  • Select “Services” and find “Google Maps Android API v2” in the middle of the list.
    • Turn the switch on.
  • Select API Access.
    • Click “Create new Android key…”
    • Paste the copied SHA-1 fingerprint and put ‘;’ followed by the package name (com.example.mapdemo).
  • Find “API key:” in the “Key for Android apps (with certificates)”

Put the Key into AndroidManifest.xml

Locate AndroidManifest.xml and open it. Find “YOUR_OWN_KEY” and replace it with the API key.

[code language=”xml”]
<application
android:icon="@drawable/ic_launcher"
android:label="@string/demo_title"
android:hardwareAccelerated="true">
<meta-data
android:name="com.google.android.maps.v2.API_KEY"
android:value="YOUR_OWN_KEY"/>
[/code]

Connect your Android device and execute the sample. You will see “Google Maps API Demos” app.