Broadcast Receiver Demo

In this demo a broadcast receiver will be implemented to show how to receive a broadcast.

Here is the action list from API 17. You can find the text file inside your ADT directory (/sdk/platforms/android-<version>/data/broadcast_actions.txt).

[code language=”java”]

android.app.action.ACTION_PASSWORD_CHANGED
android.app.action.ACTION_PASSWORD_EXPIRING
android.app.action.ACTION_PASSWORD_FAILED
android.app.action.ACTION_PASSWORD_SUCCEEDED
android.app.action.DEVICE_ADMIN_DISABLED
android.app.action.DEVICE_ADMIN_DISABLE_REQUESTED
android.app.action.DEVICE_ADMIN_ENABLED
android.bluetooth.a2dp.profile.action.CONNECTION_STATE_CHANGED
android.bluetooth.a2dp.profile.action.PLAYING_STATE_CHANGED
android.bluetooth.adapter.action.CONNECTION_STATE_CHANGED
android.bluetooth.adapter.action.DISCOVERY_FINISHED
android.bluetooth.adapter.action.DISCOVERY_STARTED
android.bluetooth.adapter.action.LOCAL_NAME_CHANGED
android.bluetooth.adapter.action.SCAN_MODE_CHANGED
android.bluetooth.adapter.action.STATE_CHANGED
android.bluetooth.device.action.ACL_CONNECTED
android.bluetooth.device.action.ACL_DISCONNECTED
android.bluetooth.device.action.ACL_DISCONNECT_REQUESTED
android.bluetooth.device.action.BOND_STATE_CHANGED
android.bluetooth.device.action.CLASS_CHANGED
android.bluetooth.device.action.FOUND
android.bluetooth.device.action.NAME_CHANGED
android.bluetooth.device.action.UUID
android.bluetooth.devicepicker.action.DEVICE_SELECTED
android.bluetooth.devicepicker.action.LAUNCH
android.bluetooth.headset.action.VENDOR_SPECIFIC_HEADSET_EVENT
android.bluetooth.headset.profile.action.AUDIO_STATE_CHANGED
android.bluetooth.headset.profile.action.CONNECTION_STATE_CHANGED
android.bluetooth.input.profile.action.CONNECTION_STATE_CHANGED
android.bluetooth.pan.profile.action.CONNECTION_STATE_CHANGED
android.hardware.action.NEW_PICTURE
android.hardware.action.NEW_VIDEO
android.hardware.input.action.QUERY_KEYBOARD_LAYOUTS
android.intent.action.ACTION_POWER_CONNECTED
android.intent.action.ACTION_POWER_DISCONNECTED
android.intent.action.ACTION_SHUTDOWN
android.intent.action.AIRPLANE_MODE
android.intent.action.BATTERY_CHANGED
android.intent.action.BATTERY_LOW
android.intent.action.BATTERY_OKAY
android.intent.action.BOOT_COMPLETED
android.intent.action.CAMERA_BUTTON
android.intent.action.CONFIGURATION_CHANGED
android.intent.action.DATE_CHANGED
android.intent.action.DEVICE_STORAGE_LOW
android.intent.action.DEVICE_STORAGE_OK
android.intent.action.DOCK_EVENT
android.intent.action.DREAMING_STARTED
android.intent.action.DREAMING_STOPPED
android.intent.action.EXTERNAL_APPLICATIONS_AVAILABLE
android.intent.action.EXTERNAL_APPLICATIONS_UNAVAILABLE
android.intent.action.FETCH_VOICEMAIL
android.intent.action.GTALK_CONNECTED
android.intent.action.GTALK_DISCONNECTED
android.intent.action.HEADSET_PLUG
android.intent.action.INPUT_METHOD_CHANGED
android.intent.action.LOCALE_CHANGED
android.intent.action.MANAGE_PACKAGE_STORAGE
android.intent.action.MEDIA_BAD_REMOVAL
android.intent.action.MEDIA_BUTTON
android.intent.action.MEDIA_CHECKING
android.intent.action.MEDIA_EJECT
android.intent.action.MEDIA_MOUNTED
android.intent.action.MEDIA_NOFS
android.intent.action.MEDIA_REMOVED
android.intent.action.MEDIA_SCANNER_FINISHED
android.intent.action.MEDIA_SCANNER_SCAN_FILE
android.intent.action.MEDIA_SCANNER_STARTED
android.intent.action.MEDIA_SHARED
android.intent.action.MEDIA_UNMOUNTABLE
android.intent.action.MEDIA_UNMOUNTED
android.intent.action.MY_PACKAGE_REPLACED
android.intent.action.NEW_OUTGOING_CALL
android.intent.action.NEW_VOICEMAIL
android.intent.action.PACKAGE_ADDED
android.intent.action.PACKAGE_CHANGED
android.intent.action.PACKAGE_DATA_CLEARED
android.intent.action.PACKAGE_FIRST_LAUNCH
android.intent.action.PACKAGE_FULLY_REMOVED
android.intent.action.PACKAGE_INSTALL
android.intent.action.PACKAGE_NEEDS_VERIFICATION
android.intent.action.PACKAGE_REMOVED
android.intent.action.PACKAGE_REPLACED
android.intent.action.PACKAGE_RESTARTED
android.intent.action.PACKAGE_VERIFIED
android.intent.action.PHONE_STATE
android.intent.action.PROVIDER_CHANGED
android.intent.action.PROXY_CHANGE
android.intent.action.REBOOT
android.intent.action.SCREEN_OFF
android.intent.action.SCREEN_ON
android.intent.action.TIMEZONE_CHANGED
android.intent.action.TIME_SET
android.intent.action.TIME_TICK
android.intent.action.UID_REMOVED
android.intent.action.USER_PRESENT
android.intent.action.WALLPAPER_CHANGED
android.media.ACTION_SCO_AUDIO_STATE_UPDATED
android.media.AUDIO_BECOMING_NOISY
android.media.RINGER_MODE_CHANGED
android.media.SCO_AUDIO_STATE_CHANGED
android.media.VIBRATE_SETTING_CHANGED
android.media.action.CLOSE_AUDIO_EFFECT_CONTROL_SESSION
android.media.action.OPEN_AUDIO_EFFECT_CONTROL_SESSION
android.net.conn.BACKGROUND_DATA_SETTING_CHANGED
android.net.nsd.STATE_CHANGED
android.net.wifi.NETWORK_IDS_CHANGED
android.net.wifi.RSSI_CHANGED
android.net.wifi.SCAN_RESULTS
android.net.wifi.STATE_CHANGE
android.net.wifi.WIFI_STATE_CHANGED
android.net.wifi.p2p.CONNECTION_STATE_CHANGE
android.net.wifi.p2p.DISCOVERY_STATE_CHANGE
android.net.wifi.p2p.PEERS_CHANGED
android.net.wifi.p2p.STATE_CHANGED
android.net.wifi.p2p.THIS_DEVICE_CHANGED
android.net.wifi.supplicant.CONNECTION_CHANGE
android.net.wifi.supplicant.STATE_CHANGE
android.speech.tts.TTS_QUEUE_PROCESSING_COMPLETED
android.speech.tts.engine.TTS_DATA_INSTALLED

[/code]

android.intent.action.PHONE_STATE will be used in this demo.

First we need to add READ_PHONE_STATE permission. Open “AndroidManifest.xml” and add the permission.

[code language=”xml”]

<uses-permission android:name="android.permission.READ_PHONE_STATE"/>

[/code]

Add a receiver tag with a proper name in the “AndroidManifest.xml” file.

[code language=”xml”]
<receiver android:name="PhoneEventReceiver">
<intent-filter>
<action android:name="android.intent.action.PHONE_STATE">

</action>
</intent-filter>
</receiver>
[/code]

Create a new class named “PhoneEventReceiver” inheriting the “BroadcastReceiver” class.

[code language=”java”]
package edu.kettering.broadcastreceiverdemo;

import android.content.BroadcastReceiver;
import android.content.Context;
import android.content.Intent;
import android.os.Bundle;
import android.telephony.TelephonyManager;
import android.util.Log;

public class PhoneEventReceiver extends BroadcastReceiver {
private static final String mDebugTag = "MY_DEBUG" ;
@Override
public void onReceive(Context context, Intent intent) {
// TODO Auto-generated method stub
Bundle extras = intent.getExtras();
if(extras == null)
return;
String state = extras.getString(TelephonyManager.EXTRA_STATE);
Log.d(mDebugTag, state);

if (state.equals(TelephonyManager.EXTRA_STATE_RINGING)) {
String phoneNumber = extras
.getString(TelephonyManager.EXTRA_INCOMING_NUMBER);
Log.d(mDebugTag, phoneNumber);
}
}
}
[/code]

PopupMenu Demo

The PopupMenu is anchored to a View. If a PopupMenu is shown in response to a click event to a button, the Popup will be displayed under the button if there is room.
The PopupMenu needs at least SDK 11. You need to open “AndroidManifest.xml” and change the minimum SDK version (“8”) to “11” since the ADT makes an app template with “8” for the minSdkVersion.

[code language=”xml”]
<uses-sdk
android:minSdkVersion="11"
android:targetSdkVersion="17" />
[/code]

Just like any other Android API Guides, the section of the PopupMenu (http://developer.android.com/guide/topics/ui/menus.html#PopupMenu) is good for just lying-down-readers for fun but not good enough for someones who really need to use it.

Here I would like to provide a complete tutorial. But notice that this is not something that you can copy and paste it to build. You have to understand what you are doing.

First let us add a button to show a Popup menu. Please notice that the android:onClick attribute has the “showPopup” method name.

[code language=”xml”]
<RelativeLayout xmlns:android="http://schemas.android.com/apk/res/android"
xmlns:tools="http://schemas.android.com/tools"
android:layout_width="match_parent"
android:layout_height="match_parent"
android:paddingBottom="@dimen/activity_vertical_margin"
android:paddingLeft="@dimen/activity_horizontal_margin"
android:paddingRight="@dimen/activity_horizontal_margin"
android:paddingTop="@dimen/activity_vertical_margin"
tools:context=".PopupMenuDemoActivity" >

<Button
android:id="@+id/buttonShowMePopup"
android:layout_width="wrap_content"
android:layout_height="wrap_content"
android:layout_alignParentLeft="true"
android:layout_alignParentRight="true"
android:layout_alignParentTop="true"
android:onClick="showPopup"
android:text="Show Me Popup" />

</RelativeLayout>
[/code]

It is always good idea to use resources to maintain strings.

[code language=”xml”]
<?xml version="1.0" encoding="utf-8"?>
<resources>
<string name="app_name">PopupMenuDemo</string>
<string name="action_settings">Settings</string>
<string name="hello_world">Hello world!</string>
<string name="archive">Archive</string>
<string name="delete">Delete</string>
<string name="popup_menu_archive_selected">Archive is selected.</string>
<string name="popup_menu_delete_selected">Delete is selected.</string>
</resources>
[/code]

A new menu XML file must be added. Add a new Android XML with “Menu” Resource Type. Use “actions.xml” as its name. Please insert two items for this demo.

[code language=”xml”]
<?xml version="1.0" encoding="utf-8"?>
<menu xmlns:android="http://schemas.android.com/apk/res/android" >
<item android:id="@+id/archive" android:title="@string/archive"></item>
<item android:id="@+id/delete" android:title="@string/delete"></item>
</menu>
[/code]

Then we are pretty much ready to write code. For the sake of simplicity I decided to use the main activity (named PopupMenuDemoActivity) as a target of the “PopupMenu.OnMenuItemClickListener” interface. This means the activity should implement the interface. When the user selects an item, Android system will call the onMenuItemClick() callback.

[code language=”java”]
package edu.kettering.popupmenudemo;

import android.os.Bundle;
import android.app.Activity;
import android.view.Menu;
import android.view.MenuItem;
import android.view.View;
import android.widget.PopupMenu;
import android.widget.Toast;

public class PopupMenuDemoActivity extends Activity 
implements PopupMenu.OnMenuItemClickListener {

@Override
protected void onCreate(Bundle savedInstanceState) {
super.onCreate(savedInstanceState);
setContentView(R.layout.activity_popup_menu_demo);
}

public void showPopup(View v)
{
PopupMenu popupMenu = new PopupMenu(this, v);
popupMenu.getMenuInflater().inflate(R.menu.actions, popupMenu.getMenu());
popupMenu.setOnMenuItemClickListener(this);
popupMenu.show();
}

@Override
public boolean onCreateOptionsMenu(Menu menu) {
// Inflate the menu; this adds items to the action bar if it is present.
getMenuInflater().inflate(R.menu.popup_menu_demo, menu);
return true;
}

@Override
public boolean onMenuItemClick(MenuItem item) {
String msg;
switch(item.getItemId()) {
case R.id.archive:
msg = getResources().getString(R.string.popup_menu_archive_selected);
Toast.makeText(getApplicationContext(), 
                   msg, Toast.LENGTH_LONG).show(); 
return true;
case R.id.delete:
msg = getResources().getString(R.string.popup_menu_delete_selected);
Toast.makeText(getApplicationContext(), 
                    msg, Toast.LENGTH_LONG).show(); 
return true;
}
return false;
}

}
[/code]


ProgressBar Demo

According to Android API Guides, we should avoid ProgressDialog. Instead, using ProgressBar in the layout is recommended.

Her is my layout xml. You may use other than RelativeLayout if you do not like it.

[code language=”xml”]
<RelativeLayout xmlns:android="http://schemas.android.com/apk/res/android"
xmlns:tools="http://schemas.android.com/tools"
android:layout_width="match_parent"
android:layout_height="match_parent"
android:paddingBottom="@dimen/activity_vertical_margin"
android:paddingLeft="@dimen/activity_horizontal_margin"
android:paddingRight="@dimen/activity_horizontal_margin"
android:paddingTop="@dimen/activity_vertical_margin"
tools:context=".ProgressBarDemo2Activity" >

<ProgressBar
android:id="@+id/progressBar"
style="?android:attr/progressBarStyleHorizontal"
android:layout_width="wrap_content"
android:layout_height="wrap_content"
android:layout_alignParentLeft="true"
android:layout_alignParentRight="true"
android:layout_alignParentTop="true" />
</RelativeLayout>
[/code]

After putting a ProgressBar into my layout, I create a Runnable object and a Thread. Call the thread with the runnable object that has my own overridden run() method.

[code language=”java”]
package edu.kettering.progressbardemo2;

import android.os.Bundle;
import android.app.Activity;
import android.view.Menu;
import android.widget.ProgressBar;

public class ProgressBarDemo2Activity extends Activity {
private ProgressBar mProgressBar;
private int mProgress = 0;

@Override
protected void onCreate(Bundle savedInstanceState) {
super.onCreate(savedInstanceState);
setContentView(R.layout.activity_progress_bar_demo2);

mProgressBar = (ProgressBar)findViewById(R.id.progressBar);

Runnable runWork = new Runnable() {
@Override
public void run() {
while(mProgress < 100) {
mProgress = doWork();
mProgressBar.setProgress(mProgress);
}
}
};
Thread thread = new Thread(runWork);
thread.start();
}

private int doWork() {
// sleep 50 millisecond
try {
Thread.sleep(50);
} catch (InterruptedException e) {
// TODO Auto-generated catch block
e.printStackTrace();
}
mProgress++;

return mProgress;
}

@Override
public boolean onCreateOptionsMenu(Menu menu) {
// Inflate the menu; this adds items to the action bar if it is present.
getMenuInflater().inflate(R.menu.progress_bar_demo2, menu);
return true;
}
}
[/code]

ProgressDialog Demo

This demo shows how to use ProgressDialog in the horizontal style. You can add your own task while the progress bar is displaying. This will also show how to update the progress bar as you are doing your task. For the sake of simplicity of source code I do not create onClickListener. Instead I use the “andoroid.onClick” property of a button.

In the layout xml, add a button and change onClick property with “startProgress” that we will be implementing in a moment.

[code language=”xml”]
<Button
android:id="@+id/btnStartProgress"
android:layout_width="wrap_content"
android:layout_height="wrap_content"
android:onClick="startProgress"
android:text="@string/start_progress" />
[/code]

Here is the full source code.

[code language=”java”]
package edu.kettering.progressbardemo;

import android.app.Activity;
import android.app.ProgressDialog;
import android.os.Bundle;
import android.view.View;

public class ProgressBarDemo extends Activity {
final static int maxValue = 500;
private ProgressDialog progressBar;
private int progress;
private int progressSomthing;

@Override
public void onCreate(Bundle savedInstanceState) {
super.onCreate(savedInstanceState);
setContentView(R.layout.activity_progress_bar_demo);
}

public void startProgress(View v) {
progressBar = new ProgressDialog(v.getContext());
progressBar.setCancelable(true);
progressBar.setMessage("Wait…");
progressBar.setProgressStyle(ProgressDialog.STYLE_HORIZONTAL);
progressBar.setProgress(0);
progressBar.setMax(maxValue);
progressBar.show();

progress = 0;
progressSomthing = 0;

// make a runnable to be used in the thread
Runnable runProgress = new Runnable() {
public void run() {
while (progress < maxValue) {

progress = doSomething();

progressBar.setProgress(progress);
}

if (progress >= maxValue) {
progressBar.dismiss();
}
}
};

Thread thread = new Thread(runProgress);
thread.start();
}

// this should return a progress value
public int doSomething() {
// sleep 50 millisecond
try {
Thread.sleep(50);
} catch (InterruptedException e) {
// TODO Auto-generated catch block
e.printStackTrace();
}
progressSomthing++;

return progressSomthing;
}
}
[/code]

DatePickerDialog Demo

This demo shows you how to use DatePickerDialog. You will see a warning “showDialog is deprecated” when you use “showDialog” method. First of all you could use, as of today, “showDialog” even though the message warns you. This link (http://www.technotalkative.com/android-datepickerdialog-example/) is an example that you can still use. However we do not know when it will stop working anyway since the method had been deprecated anyway.

Previously we used to use

  • showDialog(int id);
  • onCreateDialog(int id);

“showDialog” will be called in a handler of a button or something. And we need to prepare the onCreateDialog callback something like below.

[code language=”java”]@Override
protected Dialog onCreateDialog(int id) {
switch (id) {
case DATE_DIALOG_ID:
return new DatePickerDialog(this, mDateSetListener, mYear, mMonth, mDay);
}
return null;
}[/code]

Android’s API Guides say “you should use a DialogFragment as a container for your dialog.” I do not want to create a DialogFragment to use DatePickerDialog. Many recently tutorials explain how to use DialogFragment to use even simple dialogs. Here is a good news. We could use DatePickerDialog without knowing DialogFragment.

The idea of the new approach is that we create an instance of the “DatePickerDialog” class and set properties before we show the dialog by the “show” method. I think that this is a more integrated way to manage dialogs.

[code language=”java”]mDatePickerDialog = new DatePickerDialog(v.getContext(), mDateSetListener,
mYear, mMonth, mDay);
mDatePickerDialog.setCancelable(true);
mDatePickerDialog.setTitle("Pick a date");
mDatePickerDialog.show();
//showDialog(DATE_DIALOG_ID);[/code]

Full source code is as below.

[code language=”java”]package edu.kettering.datepickerdemoactivity;

import java.util.Calendar;
import android.app.Activity;
import android.app.DatePickerDialog;
import android.os.Bundle;
import android.view.View;
import android.widget.Button;
import android.widget.DatePicker;
import android.widget.TextView;

public class DatePickerDemoActivity extends Activity {
private TextView mDateDisplay;
private Button mPickDate;
private int mYear;
private int mMonth;
private int mDay;
private DatePickerDialog mDatePickerDialog;

@Override
public void onCreate(Bundle savedInstanceState) {
super.onCreate(savedInstanceState);
setContentView(R.layout.activity_date_picker_demo);

// get the current date
final Calendar c = Calendar.getInstance();
mYear = c.get(Calendar.YEAR);
mMonth = c.get(Calendar.MONTH);
mDay = c.get(Calendar.DAY_OF_MONTH);

// get references of views
mDateDisplay = (TextView) findViewById(R.id.dateDisplay);
mPickDate = (Button) findViewById(R.id.pickDate);

// add a click listener to the button
mPickDate.setOnClickListener(new View.OnClickListener() {
public void onClick(View v) {
mDatePickerDialog = new DatePickerDialog(v.getContext(),
mDateSetListener, mYear, mMonth, mDay);
mDatePickerDialog.setCancelable(true);
mDatePickerDialog.setTitle("Pick a date");
mDatePickerDialog.show();
//showDialog(DATE_DIALOG_ID);
}
});
// display the current date in the TextView
updateDisplay();
}

// update the date in the TextView
private void updateDisplay() {
mDateDisplay.setText(new StringBuilder()
.append(mMonth + 1).append("-")
.append(mDay).append("-")
.append(mYear).append(" "));
}

// define a variable mDataSetListener
private DatePickerDialog.OnDateSetListener mDateSetListener =
new DatePickerDialog.OnDateSetListener() {
public void onDateSet(DatePicker view, int year,
int monthOfYear, int dayOfMonth) {
mYear = year;
mMonth = monthOfYear;
mDay = dayOfMonth;
updateDisplay();
}
};
}[/code]

Not enough storage is available to process this command

I am going to utilize available PCs in labs of our department to process images. Generating intensity attenuated images takes much time (more than five minutes for one single forty layered image). It would be better to run the processing modules on many machines at the same time. Images on a NAS can be accessible (see more details in my previous posting).

In my first few trials, the new system seemed work. But after that, the network resource where all the executables are located are not accessible any more with a strange error message.

Not enough storage is available to process this command.

I came across a few interesting articles.

At first, it scared me a little bit because the articles say that registries should be backed up and restored. I just tried without backing up the registries to test my luck. 😉

After adding the item in my registry, I restarted my computer and run my image processing sub modules. It seems work for now. I will post if I come across any other problem regarding this issue.

Using NAS to save time in generating intensity attenuated images

It takes much time to compose large images into a single image. In my experiments, I am using forty images to generate an intensity attenuated image. This is even more true when the size of an image is huge like about 12,000 x 9,600. One image has 115,200,000 pixels in this size. Think about forty images when they are processed. It took me eight seconds to compose two images into one with a simulated transparent channel. More than five minutes are needed to generate a single composed image from forty images. I have around 9,628 images. From my rough calculation it will take my machine more than a month to process all the images. This is not a big problem since this process should be done only one time. But I do not like this since I have more tissue samples to process.

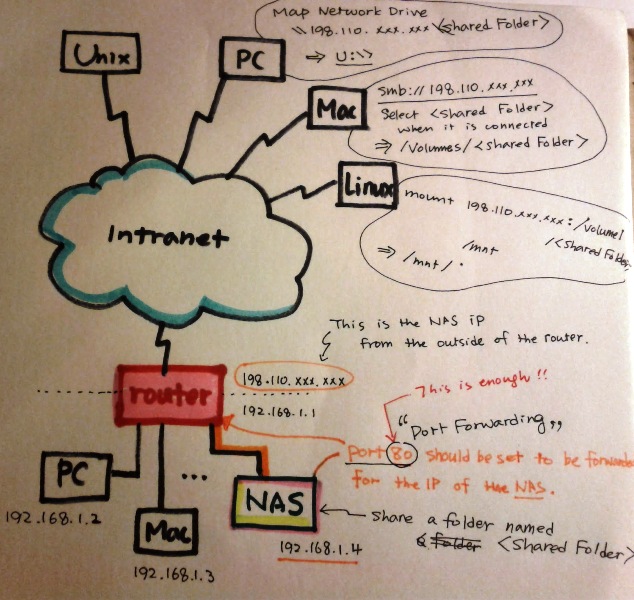
My idea is to use multiple computers at the same time in our department’s network. NAS (Network Attached Storage) can be a solution to address this issue. Using the network storage is a good approach because the bottle neck of this system is not reading and writing image data files but processing images. (I realized that reading/writing image files from an NAS take much more time than processing them from my experiments. It will not reduce total consuming time as I initially expect but is worth to use the minimal parallelism.) So it is good to use as many computers as possible to reduce whole processing time.

I purchased a NAS that is Synology DiskStation; DS212j along with two hard disk drives; 2TB and 3TB. This will give me enough space at least for a while.

I have one desktop PC and one Mac Pro under a router in my office. The new NAS is attached to the router. Four high performance PCs in a lab of the ECE department are available for five days in a week. Eight Mac minis in my Mobile App Lab are also usable. I am going to utilize all those computers as much as possible.

Here is a rough system design for it. Tools in KESMSuite should be expanded to be run on this configuration. The port number 80 (this is a default port for HTTP) for the IP address of the NAS should be ‘Port Forwarding’ in the router settings. To my surprise, this port forwarding is enough for this system to work.

Making intensity attenuated images

KESM (Knife-Edge Scanning Microscope) can scan really thin (sub-micron level) images from animal tissues. Thin slices are very critical to create accurate volumetric 3D images since the depth structure can be restored more accurately. However, one single image does not make much sense to us when it is shown one by one.

Image

It has bunch of dots and short lines instead of meaningful structure. It would be better to be seen if several images are overlapped with depth attenuation in their intensity levels.

So I implemented a method to create intensity attenuated images. Creating this kind of images is not new because we can use an image editing tool such as Photoshop to create multiple layers in which layer has an alpha channel to set its transparent level. My method does not use the alpha channel and does not need to use a specific image file format that supports the alpha channel. Original JPEG image files can be used without converting them into transparent-support-file-formats. Note that JPEG does not support alpha channel so that you cannot make it transparent with a standard tool.

Here is a sample image. One more good thing is that this image composition can be done automatically using my KESMSuite that is actively being developed. The sample image was generated using 40 consecutive images. To make a realistic pseudo 3D images, the intensity attenuation factor is calculated from a quadratic function of the depth.

Image

Make map tiles with GDAL2Tiles

GDAL and GDAL2Tiles

GDAL (Geospatial Data Abstraction Layer) includes GDAL2Tiles that can generate map tiles for OpenLayers, Google Maps, Google Earth, and similar web maps. GDAL can be installed from OSGeo4W for Windows. We can find OSGeo4W at http://trac.osgeo.org/osgeo4w/. Unfortunately this only works for 32bit Windows as of now I am writing this article.

OSGeo4W is a package from Open Source Geospatial Foundation for Win32 environments. According to the OSGeo website,

OSGeo4W is a binary distribution of a broad set of open source geospatial software for Win32 environments (Windows XP, Vista, etc). OSGeo4W includes GDAL/OGR GRASSMapServer OpenEV uDig QGIS as well as many other packages (about 150 as of fall 2009).

OSGeo4W Setup for 32bit Windows

Caution: Do not follow the instructions at http://trac.osgeo.org/osgeo4w/ or http://help.maptiler.org/betatest/ for GDAL2Tiles. Especially there is a specific instruction at http://help.maptiler.org/betatest/ that you should not follow. That instruction only worked for GDAL 1.6 beta. Here is a new instruction for installation of GDAL for using GDAL2Tiles.

  1. Download the OSGeo4W installer from here.
  2. Run the installer.
  3. Select Advanced install.
  4. Select Libs and select gdal and gdal-python in the Select packages. Caution: do not select any other packages. Some dependent packages will be selected automatically upon your two selections: gdal and gdal-python.
  5. Finish the installation
  6. You can see OSGeo4W icon ion your desktop. That is a batch file invoking the command line prompt.
  7. That’s it.

This only works on Windows 32bit machines. For 64bit Windows machines, we need to follow quite different instructions.

GDAL and GDAL2Tiles Setup for 64bit Windows

OSGeo4W cannot be used for 64bit Windows machines. We have to install GDAL and Python manually.

  1. Install Python from x86-64 Installer at http://www.python.org/getit/.
  2. Run python.exe. We have to find out the compiler version that built the python. In my case, the Python version is 2.7.3 and it was compiled and built with MSC v.1500.Python 2.7.3 (default, Apr 10 2012, 23:24:47) [MSC v.1500 64 bit (AMD64)] on win32
  3. GDAL binary packages for 64bit machines can be found at http://vbkto.dyndns.org/sdk/. Select a corresponding version in the table. In my case, release-1500-x64-gdal-1-9-mapserver-6-0 is the right version in the”MSVC2008 (Win64) -stable” row because the Python was built by 1500.
  4. Download
    1. Generic installer for the GDAL core components – gdal-19-1500-x64-core.msi
    2. Installer for the GDAL python bindings (requires to install the GDAL core) – GDAL-1.9.1.win-amd64-py2.7.msi. I chose this because 1.9.3 is the latest and my Python is 2.7.3.
  5. Install the GDAL core components. There is no option to choose the destination folder for GDAL core. It will be installed into the “C:Program FilesGDAL” folder.
  6. Install the GDAL python bindings.
  7. After the binding, you may move GDAL folder in C:Program Files into wherever you want to.
  8. Add two batch files; gdal.bat and gdal2tiles.bat into GDAL folder. You can find these two bat files below.

gdal.bat

@echo off
rem ---
@echo Setting environment for using the GDAL Utilities.
set GDAL_PATH=<em>&lt;full path of your GDAL installation&gt;</em>
@echo GDAL path is %GDAL_PATH%.
set PATH=%GDAL_PATH%;%PATH%
set GDAL_DATA=%GDAL_PATH%gdal-data
set GDAL_DRIVER_PATH=%GDAL_PATH%gdalplugins
set PROJ_LIB=%GDAL_PATH%projlib
rem ---
@echo Setting environment for using the Python.
set PYTHON_PATH=<em>&lt;full path of your Python installation&gt;</em>
@echo Python path is %PYTHON_PATH%.
set PATH=%PYTHON_PATH%;%PATH%
@echo on @if [%1]==[] (cmd.exe /k) else (cmd /c "%*")

gdal2tiles.bat
python %GDAL_PATH%gdal2tiles.py %*

Now, you are ready to use GDAL2Tiles.

  1. Just double click gdal.bat.
  2. Type gdal2tiles with proper options.

You may combine these two into a single command.

  1. Open a command prompt window.
  2. Type gdal gdal2tiles with proper options.

Good luck and have fun.

Intensity Normalization

Images from the KESM do not have consistent intensity levels. This prevents us to have a clear 3D image by stacking images in a row. Background in an image should have a similar intensity level throughout images.

One is an original 3D image. The other one  is processed 3D  image.

[slideshow]